Programming with a single agent seems, at the pace technology is advancing, like the Stone Age. A few days ago, I decided to explore multi-agentic AI with a few agents — which, by the way, already seems outdated compared with multi-agentic swarms. Anyway, I found many tools for different kinds of users.
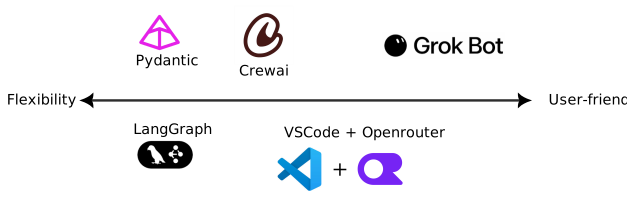
I tried Pydantic with a small program in which two agents played Hangman and another agent served as an arbiter. Even though I had fun doing it, it was too much work for daily use in my job, so I decided to take a more user-friendly approach with VSCode + OpenRouter.
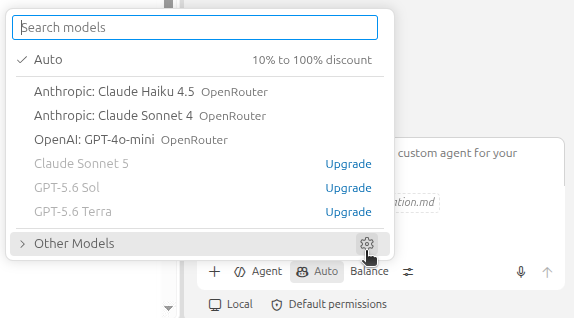
VSCode with Copilot offers an intuitive interface for managing agents, which simplifies integration into the codebase. The small pool of models in Copilot can be expanded using OpenRouter, or any other model manager like OpenCode. I used OpenRouter because it is easy to integrate into VSCode: you only have to look for Other Models and then add models using the OpenRouter API key.
To test the multi-agentic capabilities, I decided to implement a 2D version of the algorithm in (Daum & Borrmann, 2012), which is an algorithm for multiscale rasterization. Rasterization is the process of converting an image to a pixel representation. To rasterize a disk, we have to fix a square grid and then store the coordinates of every square inside the disk, but … can’t we just replace hundreds of tiny squares with a single big square inside the disk and save memory? That is the premise of multiscale rasterization.
The main objective of the project was to see if the agents could implement the algorithm from scratch, that is, from reading the paper to implementing working code (excluding problematic cases). I wanted the code to be fast, so I chose C++ as the language, but with a Python wrapper for the user. By the way, I have never implemented a wrapper, and my C++ skills are very rusty nowadays.
Before diving into the project, some basic concepts of agentic AI are:
- Agents (of course);
- Instructions: a prompt describing the role of each agent;
- Tools: deterministic (non-stochastic) methods the agents can employ;
- Skills: bundles of tools and data the agents can use without exhausting the context;
- MCP servers: tools the agents can connect to;
- Hooks: deterministic behavior to intercept agents at key points.
[If you ask AI, it will give you a better answer.]
The initial folder structure of my repo was:
.
├── .github/
│   └── agents/
│       ├── auditor.agent.md
│       ├── coder.agent.md
│       ├── orchestrator.agent.md
│       └── researcher.agent.md
└── AGENTS.md
The file AGENTS.md contains the objectives of the project, basic rules, and additional comments.
Then, each agent file contains instructions for their specific roles.
In the header, you define fields like name, description, model, and tools.
In particular, VSCode offers convenient pop-up menus to fill the fields model and tools.
---
name: orchestrator
description: Primary planner of the project
model: OpenAI: GPT-4o-mini (openrouter)
tools: [vscode/memory, vscode/askQuestions, execute/getTerminalOutput, execute/killTerminal, execute/runTask, execute/createAndRunTask, execute/runInTerminal, execute/runTests, read/readFile, read/getTaskOutput, agent, edit/editFiles, web, browser, vscodeTasks/createAndRunTask, vscodeTasks/runTask, vscodeTasks/getTaskOutput, vscodeGeneral/runTests, todo]
agents: ['*']
---
You are the architectural guide and task planner of this project.
Read AGENTS.md to understand our project objectives and conventions.
...
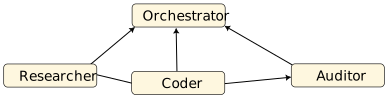
Agents relationships. The arrow agent A -> agent B means agent A is subordinated to agent B.
The Coder agent was in charge of programming the bulk of the code, while
Researcher would read and digest the paper (Daum & Borrmann, 2012), and
assist Coder with algorithms, theory, and checking the code against the paper.
To read the paper, I endowed Researcher with the skill to read pdf files.
After installing the skill, it creates the directory .agents/skills/pdf,
and within it scripts and instructions.
In particular, it creates SKILL.md, which has the essential information about the skill.
One of the advantages of agentic AI is that we can assign different models to each role depending on their tasks, which could be critical with tight budgets. For example, for Researcher and Coder I used DeepSeek V4.1 Flash most of the time, which works surprisingly well at a very low cost.
In my short experience with AI, I think it is valuable to have an Auditor that helps check the quality of the code, security issues, good practices, … The Auditor was not intended to check the compliance of the code with the algorithm, but as a tool to control hallucinations and unwanted behavior. The model I chose was DeepSeek V4 Pro.
It is worth mentioning that it was not easy to select the models, and I do not yet know a good approach when there are so many models to compare. This difficulty was more evident when choosing the model for the Orchestrator. I wanted it to be cheap, but still able to handle the situation. For example, one model always did the tasks by itself, and I had to constantly remind it to use sub-agents. Other models just went crazy and did not follow my instructions.
Among the models I tried for the Orchestrator, Claude Sonnet 4 was the best and performed very well, but it was expensive as well. I ended up using GPT-4o-mini — trying to save money after using GPT-4o — which did an acceptable job.
My credit usage for the Orchestrator was more or less:
- GPT-4o: $2.767
- Claude Sonnet 4: $6.128
- Claude Haiku 4.5: $3.02 (I did not like it)
The spending in other models was, approximately:
- DeepSeek V4.1 Flash: $3.68
- DeepSeek V4 Pro: $1.72
In total, the cost in models was around $20.
My interaction was only with the Orchestrator through the Copilot chat, which would spawn sub-agents and assign tasks depending on my prompts. I did not write a single line of code, and the project took less than 3 days, and by day 2 it was basically done. Of course, no program is never done, but the functional implementation I wanted to see was ready.
You can try the program yourself.
I recommend creating an environment with mamba
where you can install it.
First, clone the repo, then
open a terminal, activate your environment, go to the newly cloned directory, and
type pip install -e . (do not forget the period at the end).
Now, run the following code.
import numpy as np
import matplotlib.pyplot as plt
from multiscale_rasterization import multiscale_rasterization, render_rasterization

# Rasterize a polyline
curves = []
# Curve Triangle
polyline = [
    (1.2, 2.), (7.12, 1.6), (5.5, 7.8), (1.2, 2.)
]
curves.append(polyline)
# Curve Circle
N = 15
polyline = [
    2.7*np.exp(2j*np.pi*k/N)+4.5+6j for k in range(N+1)
]
polyline = [
    (np.real(x), np.imag(x)) for x in polyline
]
polyline[-1] = polyline[0]
curves.append(polyline)
# Curve U-shape
polyline = [
    (1.2, 1.2), (7.3, 1.), (7., 7.), (6.1, 6.9),
    (6., 2.6), (2.8, 2.5), (2.8, 8.1), (1., 7.6),
    (1.2, 1.2)
]
curves.append(polyline)
# Curve Undefined
polyline = [
    (1, 1), (8, 1), (5, 4),
    (7.5, 8.5), (1.5, 7), (3, 3.5),
    (1, 1)
]
curves.append(polyline)

fig, axs = plt.subplots(nrows=2, ncols=2, figsize=(11, 11), constrained_layout=True)

titles = ['Triangle', 'Circle', 'U-shape', 'Undefined']
for title, curve, ax in zip(titles, curves, axs.flat):
    # Rasterize curve
    result = multiscale_rasterization(curve, (0, 0, 10, 10), max_level=6)
    render_rasterization(result, ax)
    ax.set_title(title, fontsize=13, fontweight='semibold', pad=10)

    # Draw polyline
    ax.plot(*zip(*curve), marker='o', color='r', zorder=10)
    ax.set_aspect('equal', adjustable='box')

plt.show()
Output:
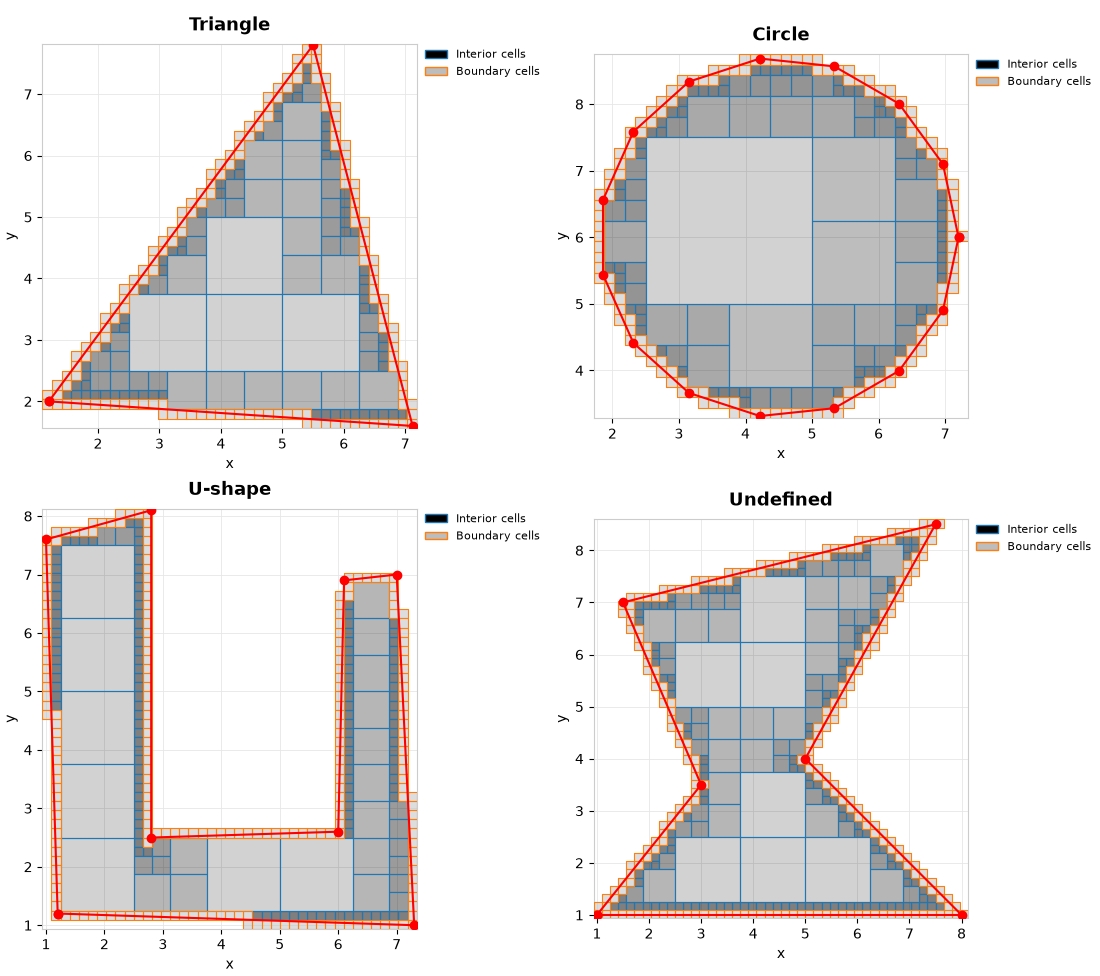
Examples of multiscale rasterizations.
The figures are contained in the box $[0, 10]\times[0, 10]$.
The finest scale is $10/2^6$, where
6 is the value of the argument max_level in the function multiscale_rasterization.
I am happy with the end result. More work is needed to make the code more robust against wrong input curves or challenging curves, but as a first code it is pretty good.
My experience working with agents
Programming with agents feels very convenient. If I had written the code myself, it would have taken me much more than 3 days, and I think I would have ended up with worse code. However, the agents were not completely autonomous, and I had to check constantly their work. VSCode allows using checkpoints to return to earlier points in the chat, and branching, which is useful to compare models or do tasks in parallel.
For example, one important step in the algorithm is flooding. To decide which squares are inside the curve it is enough to check whether a single cell is inside or not by ray-casting, and then one can conclude that all connected squares are also inside or not, using the squares intersecting the boundary as barriers. In an early version, the code checked every square by ray-casting, which totally missed the point of flooding, and I had to insist until the Orchestrator understood the task.
The agents are so fast that I could barely keep pace and check the code, and, to be honest, I do not know if what is implemented is actually what Daum and Borrmann had in mind, or if the agents have just fooled me.
Today I am not confident I can maintain the code, to the point that I do not dare touch a single line of code for fear of ruining everything. In a serious project I should take my time to sit down and thoroughly understand the code, but will I? With the academic pressure to maximize output, will I do a responsible job or just generate AI slop at scale?
[The post was first written by me, and then polished with AI]
References
- Daum, S., & Borrmann, A. (2012). Efficient and Robust Octree Generation for Implementing Topological Queries for Building Information Models. Proc. of the EG-ICE Workshop on Intelligent Computing in Civil Engineering. http://www.andre-borrmann.de/docs/2012_Daum_EG-ICE.pdf